Indulging in a Buster Bar Ice Cream Dessert is like wrapping yourself in a cozy blanket of sweet nostalgia, where every bite sings a symphony of creamy ice cream, crunchy peanuts, and rich chocolate. Just imagine that first spoonful—silky vanilla ice cream melting in your mouth, followed by the delightful crunch of buttery peanuts, all drizzled with luscious chocolate sauce that’s practically a hug in dessert form. creamy comfort food delicious banana bread.
Jump to:
- <strong>Essential Ingredients</strong>
- <strong>Let’s Make It Together</strong>
- <strong>Perfecting the Cooking Process</strong>
- <strong>Add Your Touch</strong>
- <strong>Storing & Reheating</strong>
- <strong>FAQ</strong>
- Can I use any flavor of ice cream for the Buster Bar Ice Cream Dessert?
- How long does it take to set the Buster Bar Ice Cream Dessert?
- Can I make the Buster Bar Ice Cream Dessert ahead of time?
- 📖 Recipe Card
Thinking back to my childhood, I remember summer evenings with friends, giggles echoing as we raced to finish our cones before they melted. The Buster Bar was the holy grail of frozen treats—an entire bar of happiness! Whether it’s a birthday bash or just a Tuesday that needs jazzing up, this dessert is sure to become your go-to for making any occasion sweeter.
Why You'll Love This Recipe
- The Buster Bar Ice Cream Dessert is incredibly easy to prepare, making it perfect for any skill level
- Its rich flavor profile combines sweet and salty elements that are utterly irresistible
- The stunning presentation will impress anyone you serve it to at gatherings
- Plus, it’s versatile enough to customize with your favorite toppings or ice cream flavors
I still chuckle when I remember serving this dessert at my niece’s birthday party—her friends were too busy devouring it to notice the cake!

Essential Ingredients
Here’s what you’ll need to make this delicious dish:
- Vanilla Ice Cream: Use high-quality vanilla ice cream for the best flavor and creaminess; let it soften slightly before assembly.
- Chocolate Sauce: Opt for thick chocolate sauce to create that indulgent layer; homemade or store-bought works wonders.
- Chopped Peanuts: Choose roasted and salted peanuts for a crunchy contrast; they add an essential nutty flavor.
- Whipped Topping: A light whipped topping gives an airy quality; feel free to use homemade or canned varieties.
- Chocolate Chips: Mini chocolate chips enhance the texture and add extra chocolatey goodness; they are fun and festive.
The full ingredients list, including measurements, is provided in the recipe card directly below. savory stuffed peppers.
Let’s Make It Together
Prepare yourself for an adventure in dessert-making! Follow these steps to create your very own Buster Bar Ice Cream Dessert. For more inspiration, check out this no-bake lemon icebox pie recipe.
Start with the Base: Grab a 9×13-inch pan and spread half of the softened vanilla ice cream evenly across the bottom. Use a spatula for smoothness as you create this delicious foundation.
Add Crunchy Goodness: Sprinkle a generous layer of chopped peanuts over the ice cream base. This crunchy layer creates texture and elevates the flavor profile significantly.
Layer on Chocolate Sauce: Drizzle warm chocolate sauce over the peanut layer until it’s generously covered. The warmth will slightly melt the ice cream underneath, adding even more deliciousness.
Add More Ice Cream: Spread the remaining softened vanilla ice cream on top of the chocolate-covered peanuts. Make sure it’s even so every bite delivers that creamy goodness!
Finish with Whipped Topping: Spread whipped topping over the final layer of vanilla ice cream. This light touch adds fluffiness and makes everything look dreamy.
Top It Off!: Sprinkle mini chocolate chips over the whipped topping for that final touch of sweetness and visual appeal. Don’t be shy; sprinkle generously!
Now place your creation in the freezer for about 4 hours or until firm enough to slice into bars. Once set, cut into squares and serve immediately—enjoy each bite while basking in compliments from your lucky guests!
You Must Know
- This delightful Buster Bar Ice Cream Dessert layers flavors and textures, creating a treat that’s both nostalgic and delicious
- The rich chocolate, crunchy peanuts, and creamy ice cream make it a perfect dessert for any occasion, bringing smiles all around
Perfecting the Cooking Process
To make the Buster Bar Ice Cream Dessert efficiently, start with the base layer, then freeze while preparing the ice cream filling.
Add Your Touch
Consider adding caramel sauce or using different flavored ice creams to personalize your Buster Bar Ice Cream Dessert. For more inspiration, check out this thick and chewy cookies recipe.
Storing & Reheating
Store leftovers in an airtight container in the freezer for up to two weeks. Let it soften at room temperature before serving.
Chef's Helpful Tips
- Use high-quality chocolate to enhance flavor; it makes a significant difference in this dessert
- Always let layers freeze properly to avoid a mushy texture
- Feel free to customize toppings like crushed cookies or sprinkles for extra fun!
Creating my first Buster Bar Ice Cream Dessert was a hilarious mess! My kids were covered in melted chocolate, but their joy was priceless. flavorful fried rice.
FAQ
Can I use any flavor of ice cream for the Buster Bar Ice Cream Dessert?
Yes, feel free to experiment with your favorite ice cream flavors for variety.
How long does it take to set the Buster Bar Ice Cream Dessert?
It typically takes about 3-4 hours to fully set in the freezer.
Can I make the Buster Bar Ice Cream Dessert ahead of time?
Absolutely! It can be prepared a day or two in advance for convenience.
Did You Enjoy Making This Recipe? Please rate this recipe with ⭐⭐⭐⭐⭐ or leave a comment.
📖 Recipe Card
Print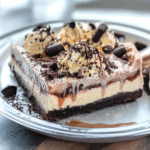
Buster Bar Ice Cream Dessert
- Total Time: 0 hours
- Yield: About 12 servings 1x
Description
Indulge in a nostalgic treat with this Buster Bar Ice Cream Dessert! This layered delight features creamy vanilla ice cream, crunchy peanuts, and rich chocolate sauce, all topped with whipped cream and mini chocolate chips. Perfect for any occasion, this easy-to-make dessert is sure to impress your guests and satisfy your sweet tooth. Gather your family and friends for a delightful experience that’s both fun to make and delicious to enjoy!
Ingredients
- 4 cups vanilla ice cream (softened)
- 1 cup chocolate sauce (thick)
- 1 cup chopped roasted salted peanuts
- 2 cups whipped topping
- 1/2 cup mini chocolate chips
Instructions
- In a 9×13-inch pan, spread half of the softened vanilla ice cream evenly across the bottom.
- Sprinkle chopped peanuts over the ice cream base.
- Drizzle warm chocolate sauce over the peanuts until covered.
- Spread the remaining vanilla ice cream evenly on top.
- Layer whipped topping over the ice cream.
- Finish by sprinkling mini chocolate chips on top.
- Freeze for about 4 hours or until firm, then cut into squares and serve.
- Prep Time: 20 minutes
- Cook Time: None
- Category: Dessert
- Method: No cook
- Cuisine: American
Nutrition
- Serving Size: 1 square (100g)
- Calories: 320
- Sugar: 28g
- Sodium: 150mg
- Fat: 19g
- Saturated Fat: 10g
- Unsaturated Fat: 8g
- Trans Fat: 0g
- Carbohydrates: 36g
- Fiber: 2g
- Protein: 5g
- Cholesterol: 30mg
