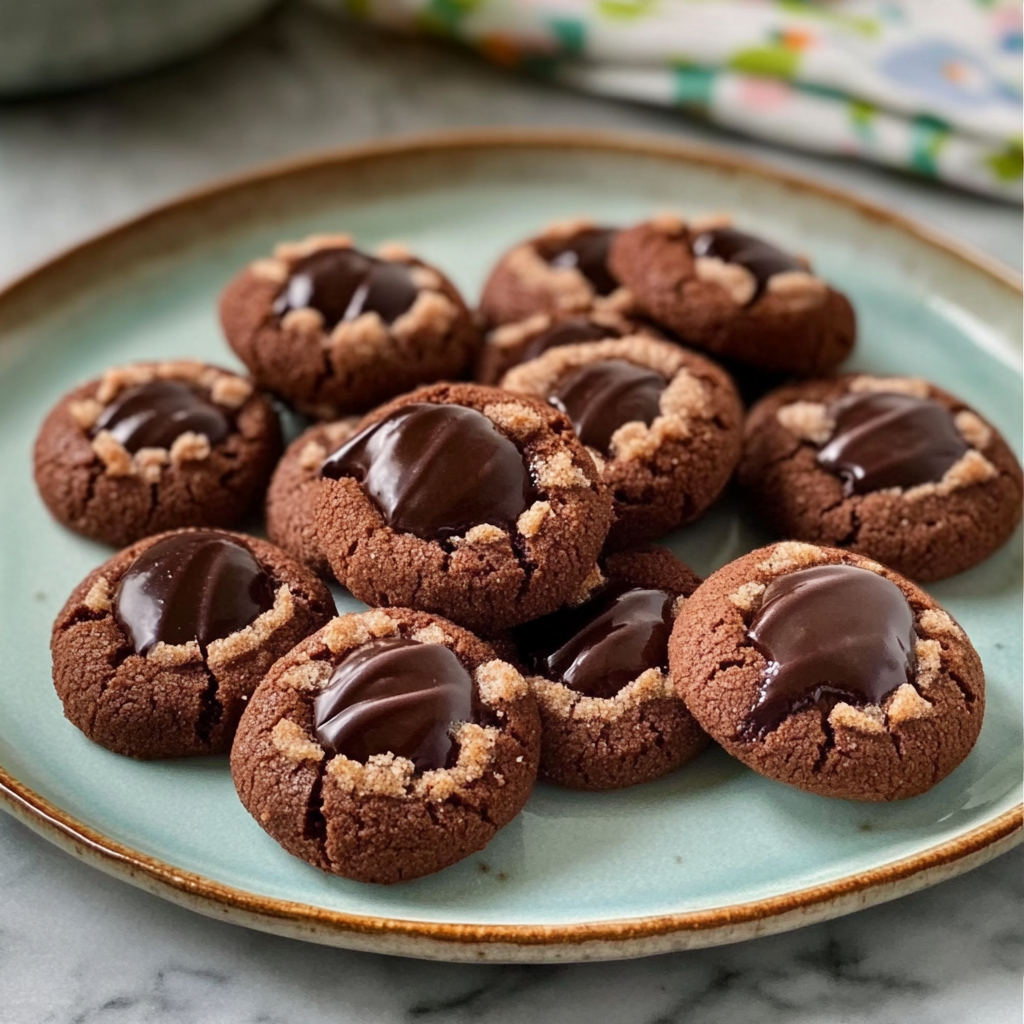
Chocolate thumbprint cookies are the ultimate guilty pleasure, delivering a delightful crunch followed by a melt-in-your-mouth chocolate experience. Imagine biting into a perfectly baked cookie, with rich cocoa flavors harmonizing beautifully with gooey chocolate centers, tempting you to savor every last crumb. other delicious thumbprint cookies. For more inspiration, check out this Double Chocolate Cookies recipe.
Jump to:
- <strong>Essential Ingredients</strong>
- <strong>Let’s Make it together</strong>
- <strong>Perfecting the Cooking Process</strong>
- <strong>Add Your Touch</strong>
- <strong>Storing & Reheating</strong>
- <strong>FAQ</strong>
- Can I use different fillings for my chocolate thumbprint cookies?
- How do I prevent my cookies from spreading too much?
- What type of chocolate is best for the filling?
- 📖 Recipe Card
These delectable delights remind me of my childhood baking escapades with Grandma. She’d whip up batches of these cookies as an after-school treat, and the aroma would fill our home, drawing everyone into the kitchen like moths to a flame. Perfect for holiday gatherings or cozy afternoons with friends, these cookies promise a flavor experience that will have you coming back for more. For more inspiration, check out this Thick and Chewy Cookies recipe.
Why You'll Love This Recipe
- These chocolate thumbprint cookies are incredibly easy to make and require minimal ingredients
- With their rich, chocolatey flavor profile, they appeal to any chocoholic’s whims
- The impressive visual appeal makes them perfect for gifting or special occasions
- Plus, they’re versatile enough to switch out fillings based on your mood or pantry stock!
I remember the first time I made these cookies; my friends devoured them in minutes and demanded I bake another batch!
Essential Ingredients
Here’s what you’ll need to make this delicious dish:
- All-Purpose Flour: Choose unbleached flour for better flavor and texture in your cookies.
- Cocoa Powder: Use high-quality unsweetened cocoa powder for a rich chocolate flavor.
- Granulated Sugar: This sweetener balances the richness of the cocoa while providing structure.
- Unsalted Butter: Use softened butter for easier mixing and a creamier texture in your dough.
- Egg Yolk: Just one yolk adds moisture and richness to your cookies.
- Vanilla Extract: Opt for pure vanilla extract to enhance the overall flavor profile.
- Chocolate Chips or Nutella: Fill those thumbprints with your choice of melted chocolate or hazelnut spread for added indulgence.
The full ingredients list, including measurements, is provided in the recipe card directly below.
Let’s Make it together
Prepare Your Oven and Baking Sheets: Preheat your oven to 350°F (175°C). Line two baking sheets with parchment paper to prevent sticking.
Create Your Cookie Dough: In a mixing bowl, cream together softened butter and granulated sugar until light and fluffy. The mixture should look pale and airy.
Add the Dry Ingredients: Gradually sift in all-purpose flour and cocoa powder while mixing until just combined. Avoid overmixing; we want tender cookies!
Add Egg Yolk and Vanilla Extract: Stir in the egg yolk and vanilla extract until fully incorporated. The dough should come together nicely without being sticky.
Scoop and Shape Cookies: Using a tablespoon or cookie scoop, portion out dough balls onto prepared baking sheets. Leave space between each ball because they will spread slightly.
Create Thumbprints!: Press your thumb gently into each dough ball to create an indentation suitable for filling later. Don’t worry if it’s not perfect; it adds character!
Bake and Fill Cookies: Bake in the preheated oven for about 10-12 minutes. chocolate chip cookie dough twists Allow them to cool slightly before filling each thumbprint with chocolate chips or Nutella.
With each step, enjoy the delightful aromas wafting through your kitchen—your taste buds will thank you!
You Must Know
- These chocolate thumbprint cookies are more than just sweet treats; they combine rich chocolate with a gooey filling, making them irresistible
- Serve them at parties or bake them for a cozy night in
- The aroma alone will have everyone flocking to your kitchen
Perfecting the Cooking Process
Start by preheating your oven to 350°F (175°C). While it heats, mix your dough and chill it briefly for perfect shaping. This helps the cookies hold their shape and ensures that they bake evenly.
Add Your Touch
Feel free to experiment with the filling! Swap out the classic chocolate ganache for raspberry jam or peanut butter if you’re feeling adventurous. delicious chocolate pecan turtles Each variation brings its own delicious twist.
Storing & Reheating
Store your cookies in an airtight container at room temperature for up to one week. If you need to reheat them, pop them in the microwave for a few seconds to restore their softness.
Chef's Helpful Tips
- Always chill your cookie dough before baking to prevent spreading and ensure chewy centers
- Use high-quality chocolate for the filling; it makes a significant difference in flavor
- Avoid overbaking; the cookies should look slightly underdone when you take them out of the oven
Sharing these cookies always reminds me of my grandmother, who would bake batches every holiday season. Her secret? A sprinkle of sea salt on top that made each bite unforgettable!
FAQ
Can I use different fillings for my chocolate thumbprint cookies?
red velvet thumbprint cookie recipe.
Absolutely! Try using fruit preserves or nut butter for varied flavors.
How do I prevent my cookies from spreading too much?
Chilling the dough before baking helps maintain their shape during cooking.
What type of chocolate is best for the filling?
Use high-quality dark or semi-sweet chocolate for a rich flavor boost.
Did You Enjoy Making This Recipe? Please rate this recipe with ⭐⭐⭐⭐⭐ or leave a comment.
📖 Recipe Card
PrintChocolate Thumbprint Cookies
- Total Time: 27 minutes
- Yield: Approximately 12 cookies 1x
Description
Chocolate thumbprint cookies are the perfect blend of crunchy and gooey, delivering an irresistible chocolate experience. With a rich cocoa flavor and a melt-in-your-mouth chocolate center, these cookies evoke memories of cozy afternoons spent baking with Grandma. Easy to make with minimal ingredients, they are ideal for gifting or special occasions. Whether enjoyed with friends or at holiday gatherings, these delectable delights will keep you coming back for more!
Ingredients
- 1 cup all-purpose flour
- 1/3 cup unsweetened cocoa powder
- 1/2 cup granulated sugar
- 1/2 cup unsalted butter, softened
- 1 large egg yolk
- 1 tsp pure vanilla extract
- 1/2 cup chocolate chips or Nutella (for filling)
Instructions
- Preheat oven to 350°F (175°C) and line two baking sheets with parchment paper.
- In a mixing bowl, cream together the softened butter and granulated sugar until light and fluffy.
- Gradually sift in all-purpose flour and cocoa powder while mixing until just combined.
- Stir in the egg yolk and vanilla extract until fully incorporated.
- Scoop dough into balls and place on prepared baking sheets, leaving space between each.
- Press your thumb into each ball to create an indentation for filling.
- Bake for 10-12 minutes, then allow to cool slightly before filling with chocolate chips or Nutella.
- Prep Time: 15 minutes
- Cook Time: 12 minutes
- Category: Dessert
- Method: Baking
- Cuisine: American
Nutrition
- Serving Size: 1 cookie (25g)
- Calories: 120
- Sugar: 8g
- Sodium: 50mg
- Fat: 7g
- Saturated Fat: 4g
- Unsaturated Fat: 2g
- Trans Fat: 0g
- Carbohydrates: 12g
- Fiber: 1g
- Protein: 2g
- Cholesterol: 20mg





0 thoughts on “Irresistible Chocolate Thumbprint Cookies Recipe to Try Now”